

Using Strap Locks on Trash Cans: Placement and Cleaning
A household trash can may hold spoiled food, sharp objects, batteries, and other items that should not be within easy reach of young children. An external flexible strap can add a child-resistant barrier, but adhesive alone is not the answer. The lid and outer body must provide two stable attachment areas, and the strap must not interfere with how the can opens, closes, empties, or receives a new liner.

An external flexible strap lock is a supplemental safety layer, not a guarantee of child safety. Continue supervising children, keep the can stable, and move medications, chemicals, batteries, sharp items, and other hazardous waste out of reach instead of treating a locked trash can as secure storage.
Start with what an external strap can and cannot do
A flexible adhesive strap works externally. One anchor attaches to a stable section of the lid, and the other attaches to a stable section of the trash can's fixed outer body. When connected, the strap is intended to limit normal lid opening on a compatible setup.
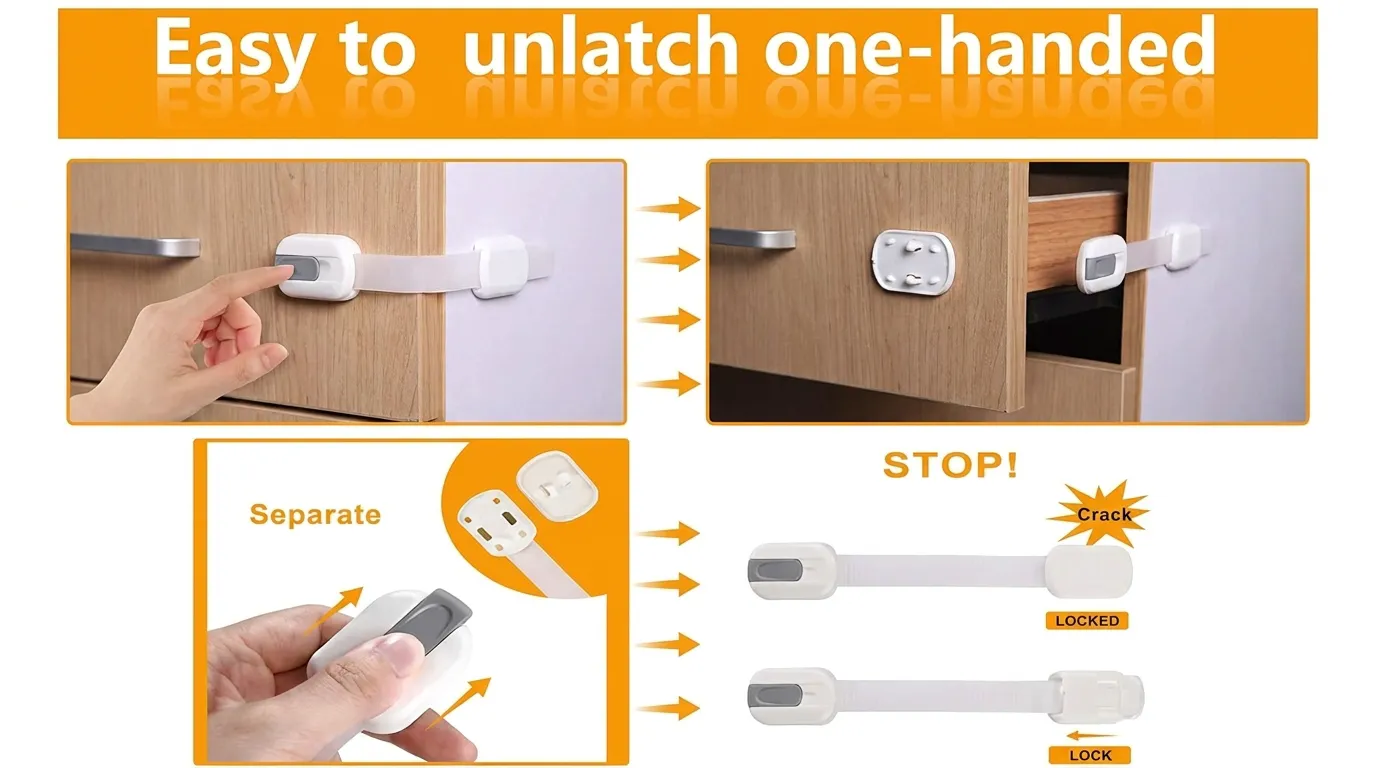
The Vmaisi Multi-Use Adhesive Strap Locks are an external flexible strap lock for selected compatible trash-can lids or other openings. They use adhesive anchors and an adult release button or buckle, depending on the setup. They are not an internal latch or a magnetic lock.
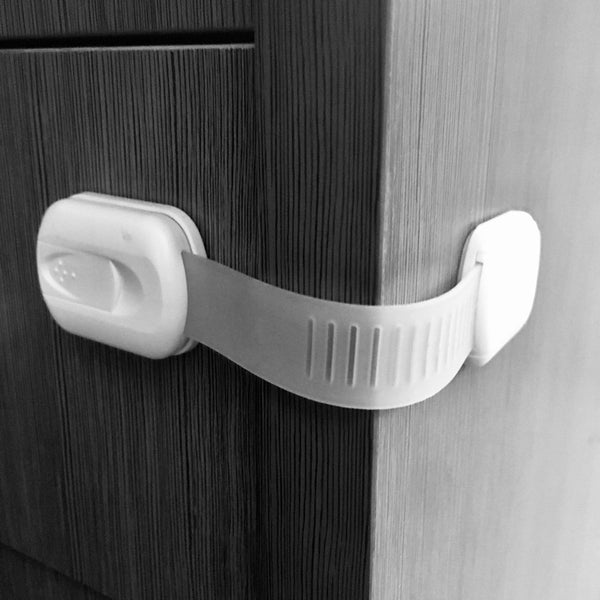
6 Pack Vmaisi Multi-Use Adhesive Straps Locks
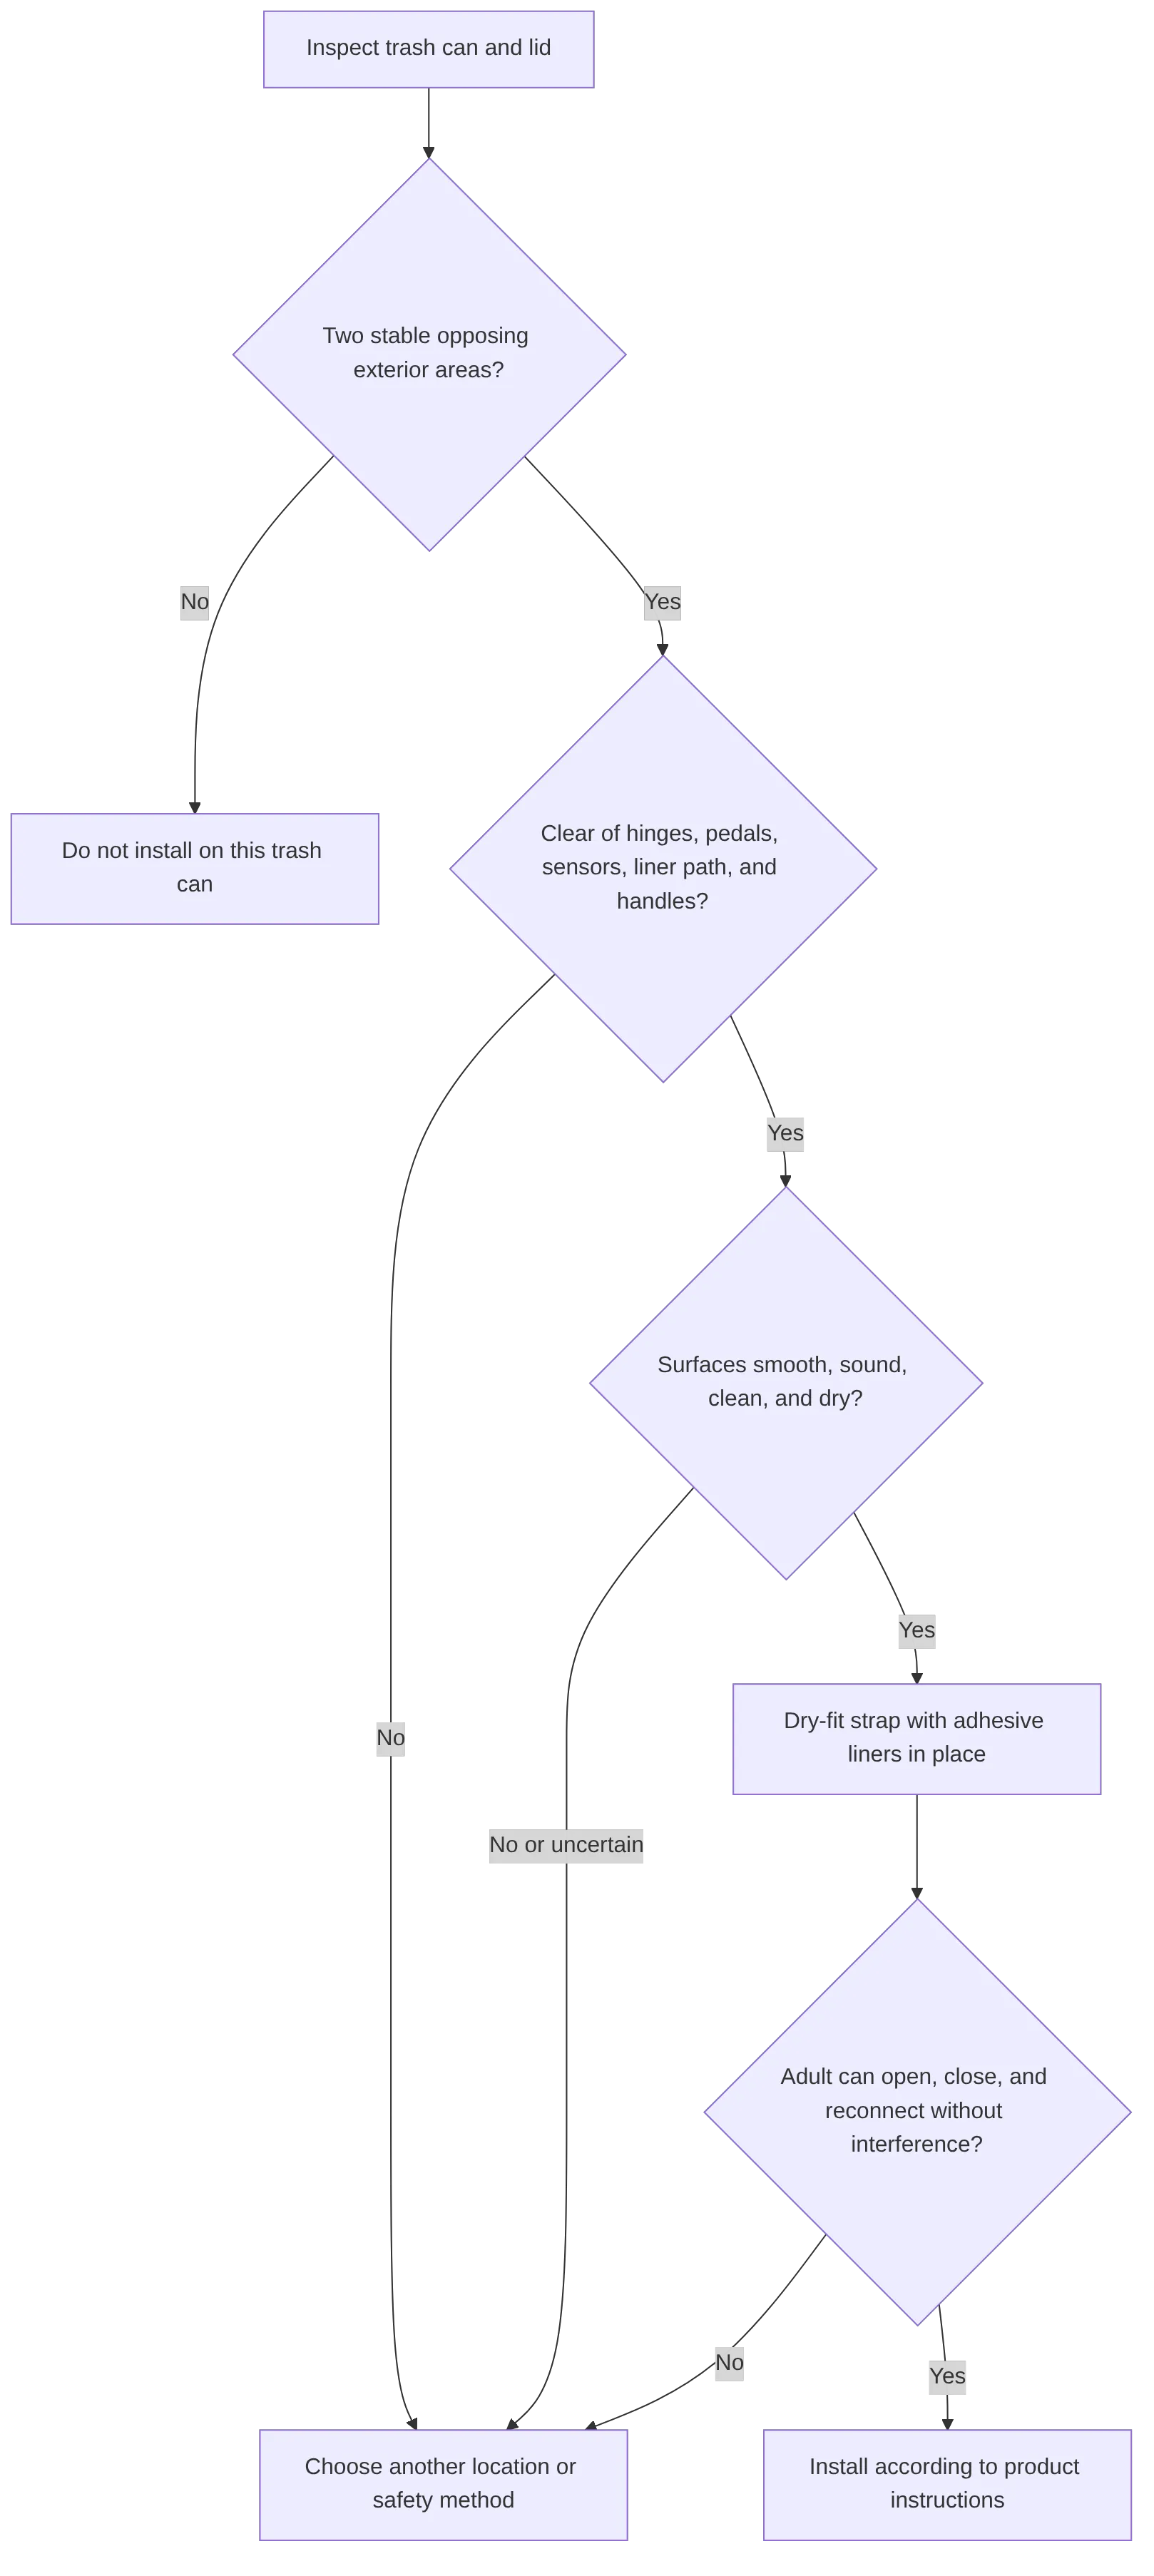
Before relying on any adhesive trash can lock, assess the can itself. A good-looking placement is not necessarily a workable one. The strap should bridge the gap between the lid and body without sitting on a closing edge, catching a liner, twisting around a corner, or pulling on a moving component.
The American Academy of Pediatrics advises using a child-resistant cover or keeping trash containers out of reach when they contain risks such as spoiled food, sharp items, or batteries. Read its home safety guidance for families with young children for broader household precautions.
Check whether the lid and body offer stable attachment points
Start by looking for two opposing exterior areas that are reasonably broad, smooth, rigid, and accessible. The lid anchor should move with the lid. The body anchor should stay in place when the lid opens, the can is emptied, or an inner bin is removed.
| Trash-can feature | What to check | Practical decision |
|---|---|---|
| Broad, rigid lid and outer-body panels | Full adhesive-pad contact and natural strap alignment | Evaluate with a dry-fit |
| Narrow rim | Limited flat contact and possible lid-edge interference | Often unsuitable |
| Curved or textured plastic | Uneven pad contact or shifting alignment | Use extra caution |
| Raised seams, ribs, trim, or labels | Gaps below adhesive edges | Avoid |
| Pedal-operated lid | Clearance from pedal linkage and rear hinge | Dry-fit carefully |
| Sensor lid | Clearance from sensors, controls, battery access, and moving panels | Evaluate with the owner's manual |
| Swing-top lid | A moving insert may not provide a stable anchor | Often unsuitable |
| Removable inner bin | A fixed outer shell is needed for the body anchor | Do not attach to the removable bin |
| Flexing lid | Ordinary pressure changes anchor alignment | Choose another location or method |
Do not force a lock onto a trash can with insufficient attachment space. Strong curves, soft-touch coatings, peeling finishes, damaged plastic, or a lid that visibly flexes can make adhesion and re-engagement less reliable.
For a broader overview of where this type of external strap may fit around the home, see Vmaisi's guide to compatible strap-lock locations.
Dry-fit the strap before choosing a position
Placement has to work for the lid and for the adults who use the can every day. A higher position may reduce direct reach for a young child, but there is no universal mounting height. Select a location that adults can operate comfortably while staying clear of the lid's travel path and nearby traffic.
Place the lid-side adhesive pad on a firm section that moves as one piece with the lid. Avoid flexible lips, handles, hinged flaps, sensor covers, and the very edge where the lid meets the rim.
Place the body-side pad on the stationary outer shell. Do not attach it to a lift-out bucket, a pedal mechanism cover, a decorative panel that moves, or a seam between components.
Before removing any adhesive backing, complete this dry-fit routine:
- Empty the can or remove the inner bin so you can see the lid path and liner area.
- Close the lid fully.
- Hold both strap anchors in the proposed positions with their adhesive liners still attached.
- Position the flexible strap as if it were connected, without forcing it.
- Confirm the strap crosses from the lid to the stationary outer body.
- Simulate unlocking and opening the lid through its normal range of motion.
- Test the pedal, handle, or sensor as you normally would.
- Replace a liner and check whether bag changes could snag the strap or pads.
- Close the lid again and ensure it sits flush before reconnecting the strap.
Reject the position if the strap twists sharply, the lid is pulled sideways, the anchors sit partly over a curve or seam, or routine adult use feels awkward. An external lock should not become a pull handle for a child or an obstacle for an adult.
Prepare clean, dry surfaces before installation
Surface preparation matters because food splashes, dust, grease, fingerprints, cleaner residue, and moisture can reduce adhesive contact. General adhesive guidance from 3M also emphasizes clean, dry bonding surfaces.
Follow the strap-lock manufacturer's instructions first. Then use this conservative process:
- Remove loose debris and visible food residue from each chosen attachment area.
- Clean away grease, dust, and cleaner film according to the trash-can and lock care guidance.
- Allow both surfaces to dry fully.
- Avoid repeatedly touching the prepared areas before installation.
- Recheck your dry-fit marks before peeling the adhesive liners.
- Apply each anchor in its final location and press as instructed.
- Avoid lifting, shifting, or reapplying an anchor unless the product instructions specifically say that is appropriate.
Do not invent a curing period. Follow the manufacturer's stated waiting time, if any, before relying on the installed strap. A waiting time published for a different brand or product type does not automatically apply here.
Surface condition can change after installation, too. Moisture, cooking residue, cleaning residue, textured plastic, curved geometry, and normal lid flex may all affect adhesion over time. For related guidance on evaluating external strap placement, review Vmaisi's strap-lock surface-fit considerations.
Build re-locking and cleaning into the routine
Make re-locking part of the household routine. The strap must be reconnected after every adult opening. A strap left disconnected does not provide the intended access barrier.
Use this adult sequence each time:
- Inspect the strap and anchor edges before opening.
- Use the intended adult release control. Do not pry at adhesive pads or force the strap.
- Open the lid normally, keeping the strap clear of the lid path.
- Dispose of waste without leaving hazardous items exposed.
- Close the lid fully.
- Check that both anchors still look aligned and flat.
- Reconnect the strap.
- Perform a light, non-forceful check that the connection is seated.
Clean around the attachment points during regular trash-can care. Wipe nearby grime carefully rather than soaking the strap, release area, or adhesive edges. Do not scrape, aggressively scrub, pry, or tug at the perimeter of an adhesive pad. Avoid unverified solvents, abrasives, heat, and adhesive-removal products on an installed lock because they may affect the can finish, strap components, or bond.
Inspect after spills, deep cleaning, liner changes, hard pulls, and as part of your normal cleaning routine. Stop relying on the lock immediately if you notice:
- Lifting corners, peeling, shifting, or loose adhesive pads.
- Grime or moisture collecting beneath an adhesive edge.
- A pad that no longer lies flat.
- A cracked, stretched, torn, or otherwise damaged strap.
- A damaged, sticky, jammed, or unreliable release control.
- Lid misalignment, incomplete closure, or interference with normal opening.
- A strap that no longer reconnects consistently.
Replacement should include a new compatibility review. Do not assume the same spot remains suitable if the can's finish, lid movement, liner arrangement, or household use has changed.
Questions caregivers often ask
Can I use an adhesive strap lock on every trash can?
No. A compatible trash can needs stable opposing exterior areas, sufficient clearance, and clean, fully dry surfaces. Narrow rims, textured surfaces, heavy curves, swing-top inserts, flexing lids, and moving parts may make a setup unsuitable.
Can I attach the body anchor to a removable inner bin?
No. The body anchor should attach to the stationary outer shell. An inner bin moves during emptying and could separate from the lid-side anchor arrangement.
Where should I place a strap on a pedal trash can?
Only use a location that stays clear of the pedal, linkage, rear hinge, lid travel, liner path, and the adult's normal foot position. Always dry-fit before adhesive installation.
How should I clean around adhesive pads?
Follow product care directions, wipe carefully around the pad edges, and keep residue and moisture from accumulating. Avoid soaking, prying, scraping, or aggressive scrubbing at the adhesive perimeter.
When should I replace the lock?
Replace it or choose another safety method if adhesive pads lift, the strap is damaged, the release control fails, contamination cannot be addressed without compromising the setup, or the strap no longer re-engages reliably.
A locked trash can is only one layer of protection. Keep hazardous household waste out of reach, use appropriate disposal methods, and supervise children. The U.S. Environmental Protection Agency's household hazardous waste guidance offers additional direction for managing items that should not be left accessible.